[UPDATED Apr 25] If you have tried to answer this question, you will have come across the terms conversions and attribution. In this article, I am going to break down these terms and give you some pointers to help you with Google Ads conversion tracking.
What are conversions in Google Ads?
Let’s look at the flow when someone clicks on your ad. Depending on your ad’s goal, the destination might be the home page of your website or it might be another purpose-built page. Getting someone to click on your ad and visit your website is one thing. A more valuable outcome will be a specific action taken on your website – it could be buying a product, booking an appointment or providing an email address. These desired actions can be measured as ‘conversions’. You decide what actions you want to measure because they have value to your business. Measuring conversions is known as ‘conversion tracking’.
What is the difference between the terms ‘conversion’, ‘goal’ and ‘key event’?
Terminology varies depending on the tool you are using. In Google Analytics, the term ‘key events’ is used for the events that you flag as having business value.
Google Ads uses the term ‘conversions’. However, when you first go to create a conversion, you must click on the ‘Goals’ menu item. After that, the terminology reverts to ‘conversions’.
How to set up conversions in Google Ads
There is more than one way to do this
As at April 2025, Google seems to be rolling out changes to the Google Ads conversion set-up interface. Some accounts still have the old interface and some have the new.
I will cover 3 methods:
- Old interface – import conversions from GA4.
- Old interface – create a conversion from your website using Google Tag Manager. This has 2 parts to it – you need to create the conversion in Google Ads and you need to create a tag in Google Tag Manager to send conversion events to that conversion.
- New interface – create a conversion from your website using Google Tag Manager. This has 2 parts to it – you need to create the conversion in Google Ads and you need to create a tag in Google Tag Manager to send conversion events to that conversion (the GTM part is the same, whether you are using the Google Ads old or new interface).
The Google Ads Conversion screen is accessed through the Goals icon. Choose ‘New conversion action’ to create a new conversion.
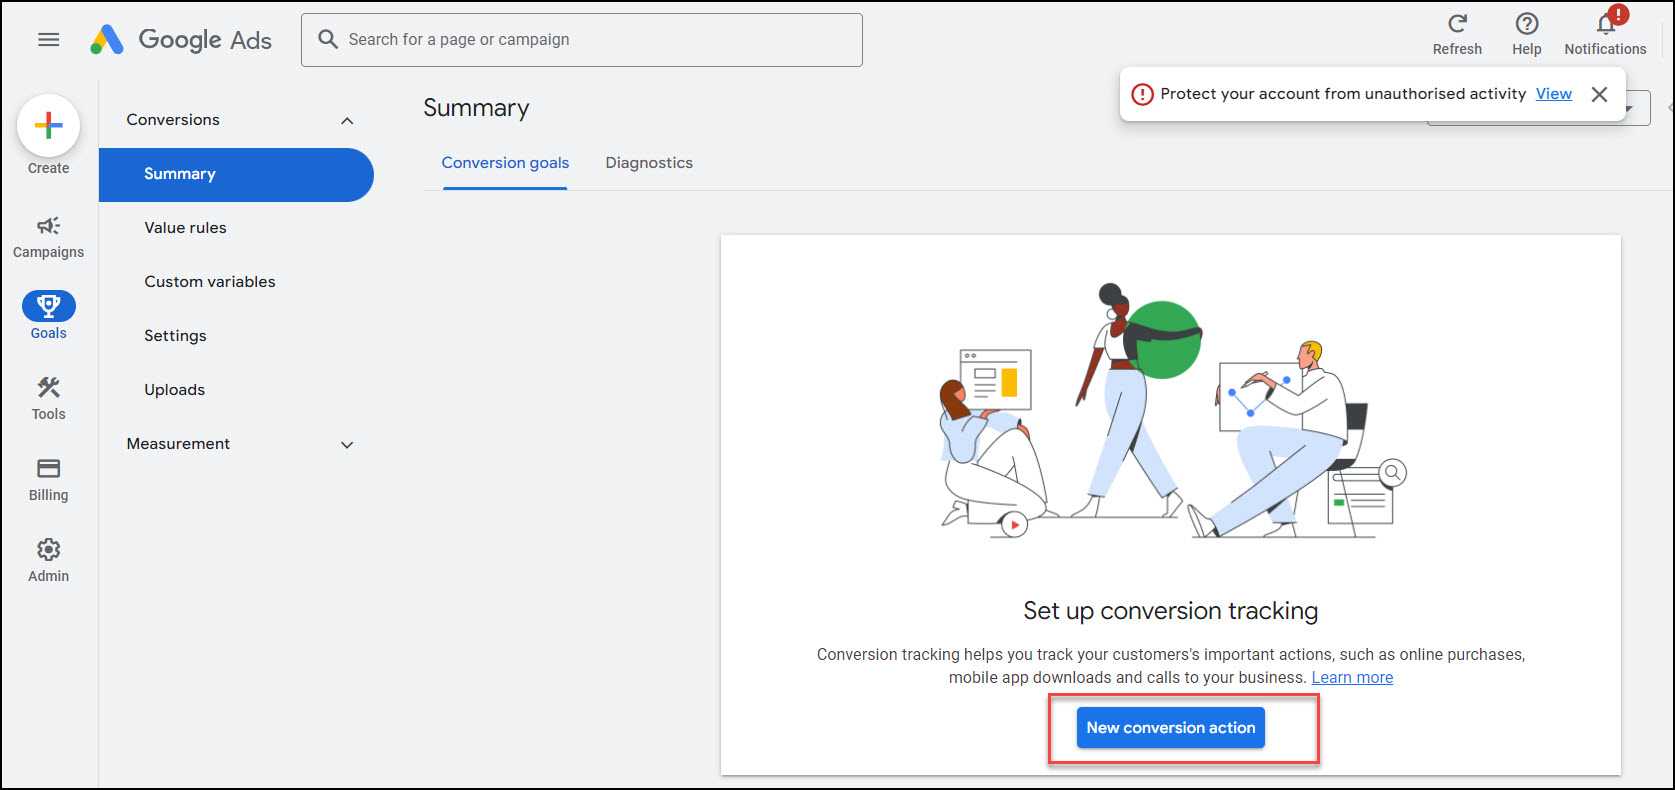
If you already have some conversions, the screen will look a little different. Choose ‘Create conversion action’ to add a new conversion action.

Old interface – Import conversions from Google Analytics
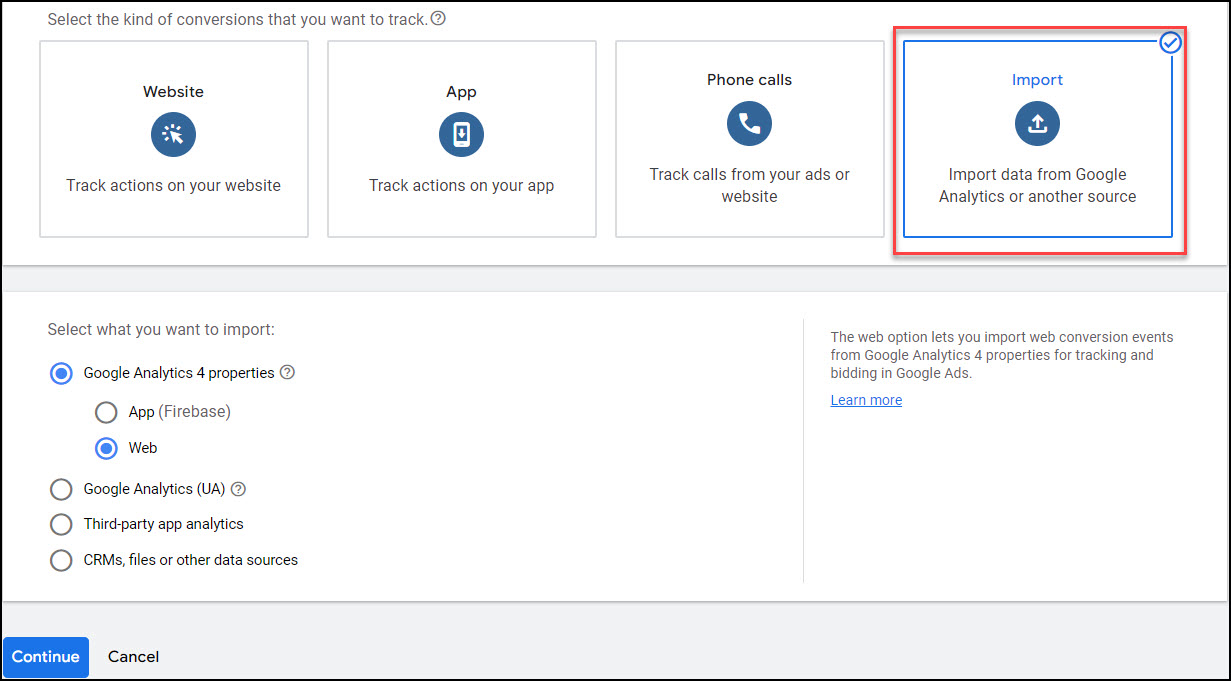
On the next screen, click ‘Import’. You might choose this method if you are already recording your goals and transactions in Google Analytics. This is the simplest way to set up some conversions in Google Ads, but it will give you a slightly different outcome, which I will explain later in the article. In order to import goals from Google Analytics, your Google Ads and Google Analytics accounts must be linked.
After you have clicked ‘Import’, choose ‘Google Analytics 4 properties’ and ‘Web’ and click Continue.
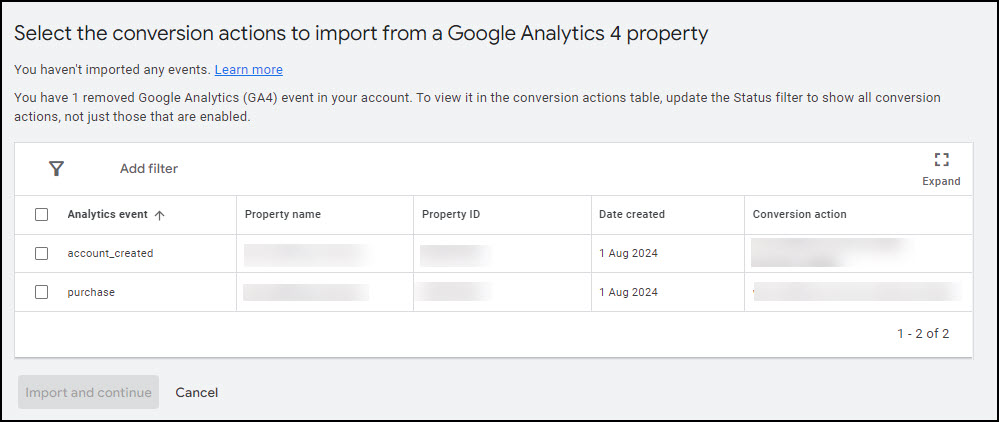
You will be shown a list of key events from the linked Google Analytics account. Select the analytics events you want to import and click ‘Import and Continue’. Click ‘Done’.
This is a good choice for simple pageview-based goals that have been set up within GA4. For event-based goals, I prefer to use the Google Tag Manager method. You may have already set up the triggers in Google Tag Manager to send these events to Google Analytics, and you can re-use these for the Google Ads conversion tracking tags.
Once you have imported the events (they will now be conversions), you can edit their settings.
Old interface – Track conversions from your website using Google Tag Manager
First part – create the conversion in Google Ads
Choose ‘Website’. In the ‘Website’ pathway you are creating the conversions from the ground up.

After choosing ‘Website’, you will be prompted to scan your website. Enter your website’s URL and click ‘Scan‘.

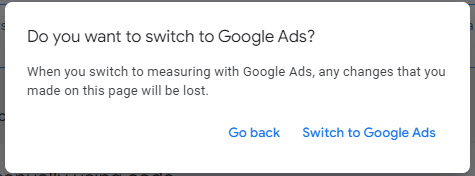
After you have scanned the website, your next steps will depend on whether Google Ads is linked to GA4. If these are linked, you will see the following message. If you are going to use Google Tag Manager, it is important that you click ‘Use Google Ads only‘.

Then click ‘Switch to Google Ads‘.
Then, scroll down to the section ‘Create conversion actions manually using code‘. If Google Ads and GA4 are not linked, the previous messages are not visible and you should scroll down to ‘Create conversion actions manually using code‘.

Click ‘Add a conversion action manually‘.
Note: Below this is an option to turn on enhanced conversions. It is checked by default. I uncheck it, unless I have had instructions from the client to implement enhanced conversions and the client is aware of the required privacy disclosures.
Next, you will need to make a few selections to complete the form. Some of them deserve a bit of elaboration:
- Category – choose the category from the drop-down list that most accurately describes the conversion.
- Name – type a name for the conversion (this can be anything).
- Value – if the conversion is an ecommerce transaction (online purchase), choose ‘Use different values for each conversion’, because you will want to track the actual transaction amount. Otherwise choose ‘Use the same value for each conversion’. If the action doesn’t have a monetary value, make an estimate of what you think the action is worth to you. You can always change the value later if you decide it wasn’t the best one to pick.
- Count – the choices are ‘Every’ or ‘One’. This is the scenario – after clicking on your ad, a person might complete the same conversion action more than once, either in the same session or a later session (cookies on their browser continue to identify them as an ad clicker for a period after they have clicked on the ad). If this particular conversion action has value to you every time it is completed by the same person, choose ‘every’. If it only has value to you once, then choose ‘one’. For example, an online purchase has value every time it happens, while providing an email address for your list has value once for each person.
- Click-through conversion window – this is for the scenario when someone clicks on your ad and then might complete the conversion action later. Choose the maximum period after the ad click that you want a conversion to count as attributable to the ad.
- Engaged-view conversion window – this is for the scenario when someone sees your video ad on YouTube and watches for a specified period of time before converting later. Choose the maximum period after the video view that you want a conversion to count as attributable to the ad.
- View-through conversion window – this is for the scenario when someone sees your display ad (doesn’t apply for search ads) but does not click on it. Choose the maximum period after the ad impression that you want a conversion to count as attributable to the ad.
- Attribution – the attribution model determines how much credit each ad interaction gets for your conversions. ‘Google paid channels’ will be pre-selected if you have used the steps described above. The next field is defaulted to ‘Data-driven’. You an leave it as is. Generally you can choose any and it won’t make or break your conversion tracking.
After you click ‘Create and Continue’, you will see 3 options – ‘Install the tag yourself’, ‘Email the tag’, ‘Use Google Tag Manager’.
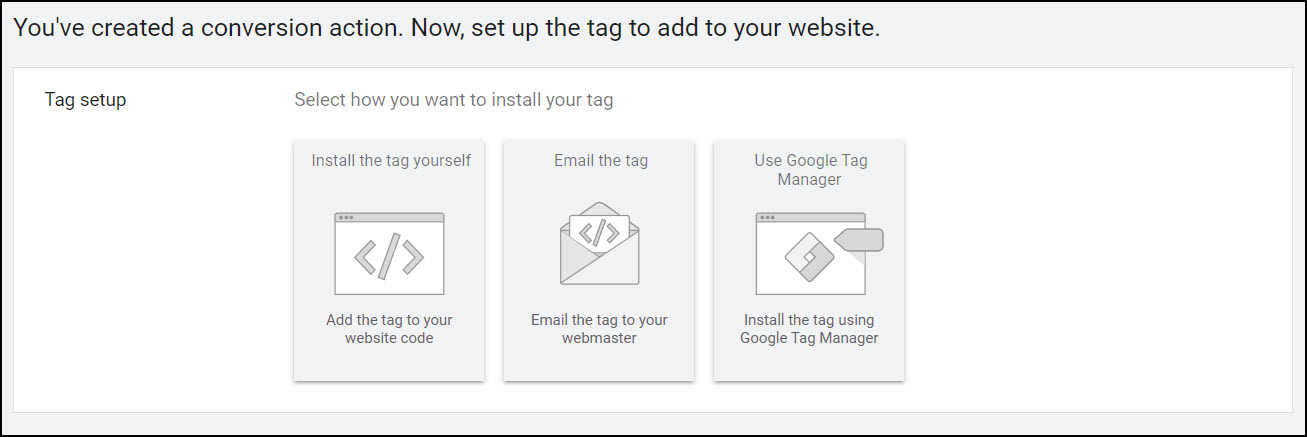
If the Google Tag Manager option is missing when you create a conversion in Google Ads, it is probably because Google Ads and GA4 are linked and you did not click ‘Use Google Ads only’ in the earlier step. You will need to delete this conversion and create the conversion again, this time clicking ‘Use Google Ads only’ after you have scanned the website (see screenshot above).
For a ‘Website’ conversion, you have now completed the part that is done in the Google Ads interface. You still need to do the other part, which is done in Google Tag Manager.
Second part – set up the tag in Google Tag Manager
After you have chosen the option to use Google Tag Manager, you will get a Conversion ID and a Conversion Label that you can copy. Click ‘Next’ and then ‘Done’. You will then need to go to Google Tag Manager to create the corresponding tag that will track the action.
In Google Tag Manager, create a new tag using the ‘Google Ads Conversion Tracking’ tag type. Give the tag a name (a good convention is to start it with the name of the destination system, e.g. ‘Google Ads’). Paste the Conversion ID and Conversion Label into the appropriate fields. You don’t need to specify a Conversion Value here if you have already specified a constant value in the Google Ads conversion set-up process. All other fields can be left as-is.
The trigger is the part that requires the most thinking. What is the action that identifies that this conversion has happened? For accurate tracking, the set of conditions you specify for the trigger must uniquely identify that this conversion has occurred.
If it is a view of a specific page, then the trigger will be a Page View trigger type, with a condition based on Page URL.
If it is a form submission, then things get more complicated. Depending on how the form works, the trigger could be a Form Submission trigger type, a Custom Event trigger type or an Element Visibility trigger type. Analytics Mania has written a very good article on form tracking which helps you to figure out which option to choose (or, if you prefer to hand this off to an expert, I can help you with Google Tag Manager services).
You will also need to add a Google Tag (see the Google support article ‘Set up your Google Tag‘) and Conversion Linker tag (the GTM interface will guide you if it doesn’t detect one).
New interface – Track conversions from your website using Google Tag Manager
First part – create the conversion in Google Ads
In the new interface, after clicking to set up anew conversion, the next screen looks like this:
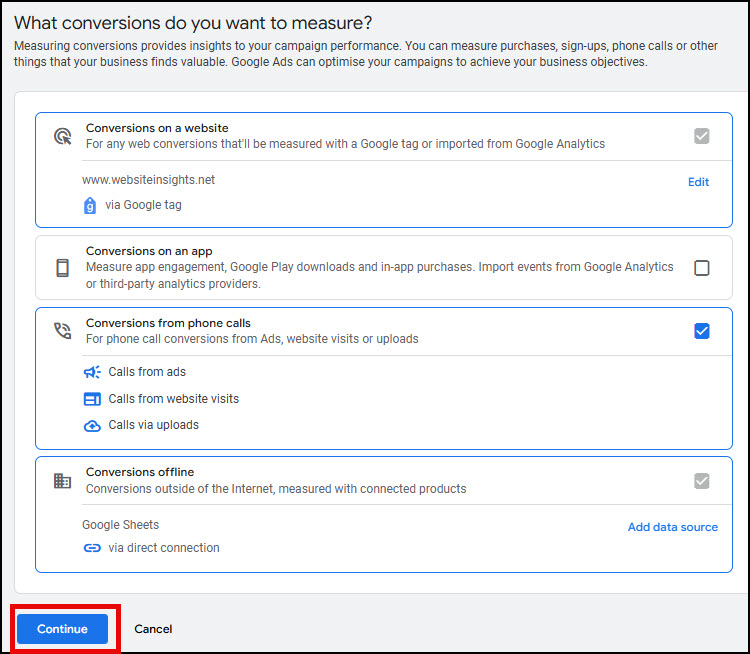
‘Conversions on a website’ is already ticked by default. If there is no red warning beside the words ‘via Google tag’, you can just click ‘Continue’.
If, on the other hand, you see this warning that the Google tag is not installed…

… you will need to add a Google tag with your Google Ads ID to your Google Tag Manager container. Click ‘Edit’ and follow the prompts.
When all is well with the Google tag, clicking ‘Continue’ will bring you to this screen where you will need to choose a conversion category.

In the next screen, you will see your website as a conversion source with ‘No event selected’. Click ‘Set up’.

Choose the radio button ‘Create a manual event’, give it a name and click ‘Use event’.

At this point you might want to click Settings and check that you are happy with the default settings, or change some of them. The options are very similar to those in the old interface (see above).
Then click ‘Save and continue’.

In the next screen, click ‘Use Google Tag Manager’.
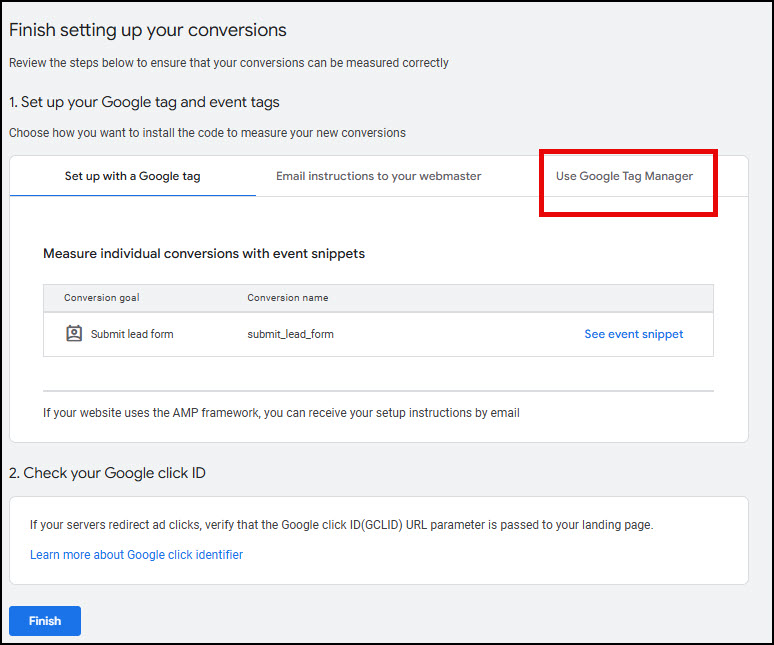
Copy the Conversion ID and Conversion label, as you will need these in the next section.

Click ‘Finish’.
Second part – set up the tag in Google Tag Manager
Follow the steps as for the old interface.
What will I see once my conversions are set up?
In the Conversion table, you will see the list of conversions you have created, grouped by Category:

The Conversion action column contains the name of the conversion.
The Action optimization column can contain Primary or Secondary. When you first create a conversion, it will be ‘primary’, which means it is used for bidding optimization. In the conversion’s settings, you can change this to Secondary, which means the conversions will be recorded but not used for bidding optimization.
The Conversion source column tells you whether the conversion has been imported from Google Analytics or generated from your website.
All conv. counts the conversions attributable to Google Ads. All conv. value is the value you have assigned to this type of conversion multiplied by the count for the period.
The Status column could include values:
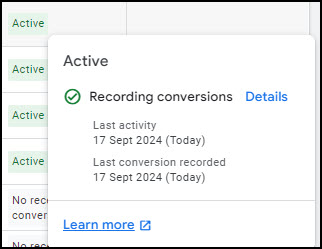
- Active – Google Ads has seen this conversion in the last 7 days.
- Inactive – Google Ads is yet to receive data for this conversion.
- No recent conversions – Google Ads has not seen this conversion in the last 7 days.
Google Ads is notified every time one of these conversion actions happens on your website, even when the visitor did not come to the website from an ad. Status tells you whether Google Ads is receiving data about this conversion, irrespective of whether the website visitor had clicked on your ad.
If you hover over the value in the Status column, you will see some more detail on when the conversion was last seen. This differentiates ‘Activity’ (a conversion event was received, even it was not preceded by a Google ads click) from ‘Last conversion recorded’ (a conversion attributed to Google Ads).
Conversion data will also be included in the tables in the main area of Google Ads, so you will be able to see conversions by Campaign, by Ad Group Reports, by Ad and by Keyword.
What if you want to count only certain conversions for an Ads campaign?
If ‘Campaign A’ brings website visitors who complete various types of conversion actions, all of these conversions will be counted for Campaign A. In some cases, you might not want this. If ‘Campaign A’ was designed to entice people to complete one particular conversion action, and you only want to count that, you can specify the particular conversion (or conversions). Do this in Campaign settings, in Conversions Goals, by choosing campaign-specific conversions.
Of course, you won’t need to do this if your landing page design makes it impossible to complete ‘irrelevant’ conversions when you click on Campaign A’s ads.
What is attribution and which model should I choose?
In setting up the Conversion Action, you were asked to choose an Attribution Model.
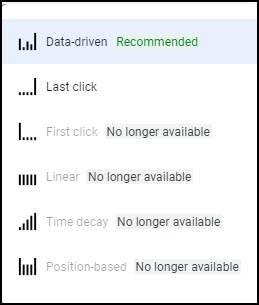
The big change here is that now only ‘Data-driven‘ and ‘Last-click‘ are available to be chosen.
If you said that one conversion was worth 1 unit of value, the attribution model determines how that credit should be spread across your campaigns (or across Ad groups or across individual ads) if more than one of these precedes the conversion action.
‘Last click’ assigns all the value to the campaigns(or Ad group or across individual ad) that was last clicked before the conversion happened.
‘Data-driven’ is a calculated assignment of value, taking into account the contribution of each ad interaction that occurred on this user’s pathway to conversion.
Note that choosing an attribution model in Google Analytics is different; here, the attribution model determines how that credit should be spread across channels that bring people to your website, not just across ads.
Another word about attribution – the difference between importing conversions and measuring them on your website
The choice you make between importing conversions from Google Analytics and sending them from your website with Google Tag Manager may make a difference to the conversions you see in Google Ads.
Google Analytics is aware of all the channels by which people come to your website, and will attribute conversions accordingly. If someone comes to your website from a Google Ad, then comes from organic search and converts, Google Analytics will know about the sources of these 2 visits and calculate the spread of attribution accordingly. When the key event is imported to Google Ads as a conversion, this attribution share stays with the conversion. Google Ads and Google Analytics will report the same number of conversions attributed to Google Ads.
On the other hand, a conversion send by Google Tag Manager to Google Ads will only know the source of website visits when that source was Google Ads. Therefore, in the scenario given above, Google Ads would attribute this conversion to Google Ads. Hence, a higher number of conversions will be reported in Google Ads.
GA4 has introduced a setting where you can change the way imported conversions are counted. In ‘Attribution settings’, the default is that paid and organic channels receive credit for conversions shared with Google Ads. You can change this to ‘Google Paid channels’. This will make the imported conversions behave more like conversions sent from the website with Google Tag Manager.
Are my Google Ads driving sales and generating leads?
So, that is how to measure conversions. Now that you have conversion tracking set up and you’ve verified that conversions are being recorded, you can see this data in your Google Ads interface.
Conversion data columns can be seen in the tabular reports for Campaigns, Ad Groups, Ads and Search terms. If you want to add or re-order columns, click on the ‘Columns’ icon.
You’ll notice that these numbers are for all conversions. Individual conversions can be seen in any of the Overview reports. Many of the cards within the Overview reports let you choose the metrics you want to see, including individual conversions.
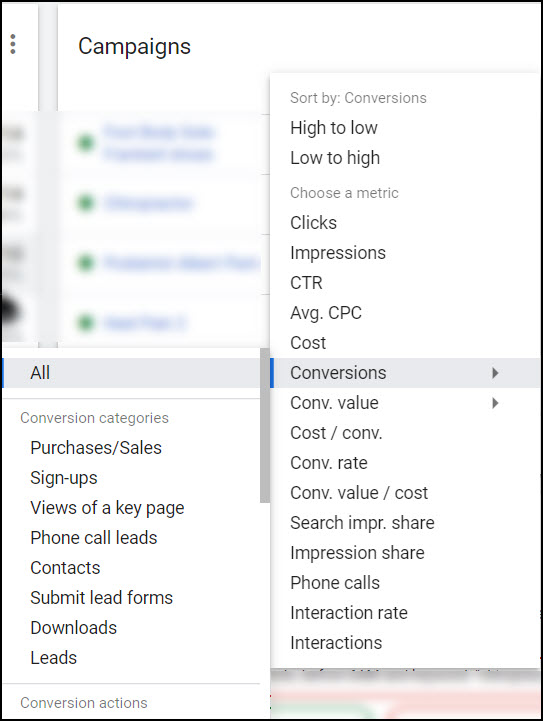
Another place to look is ‘Attribution’ reports, found under the Goals menu. The ‘Conversion paths’ report gives you a clear picture of metrics for all conversions or by individual conversion. You can also choose to see the data broken down by Campaign, by Ad group, by Keyword, by Creative or by Device. A really handy report!
If you’ve read this far, you’re obviously passionate about getting your Google Ads conversion tracking right. But I know how time-consuming it can be! If you’re ready to outsource conversion tracking, check out my Google Tag Manager services.

